LearnCloud Admin Panel Guide
- Tiffany Janzen
- Kyle Lubieniecki (Unlicensed)
Table of Contents
What is the LearnCloud Admin Panel?
This guide explains how to use the LearnCloud Admin Panel, which is accessed through the LearnCloud website. The LearnCloud Admin Panel is where the Deployment Admin has access to create a Deployment Library, update and edit Content and Collections for the Deployment Library, and visualize or export analytics that have been captured from the Rumie Tablets.
The Deployment Admin can add their own Content to the LearnCloud website, which then can be used in their Deployment Library. They can also use the Content and Collections already available on the LearnCloud website to add to their Deployment Library.
Deployment Libraries
What is a Deployment Library?
A Deployment Library is a dedicated space for all Collections and Content that is to be uploaded onto the Rumie Tablets. It can be loaded onto one or many Rumie Tablets. Usually, it is loaded onto many Rumie Tablets. Each Deployment Library comes preconfigured with Utilities that include Standard System apps and Deployment Utilities.
Creating a Deployment Library
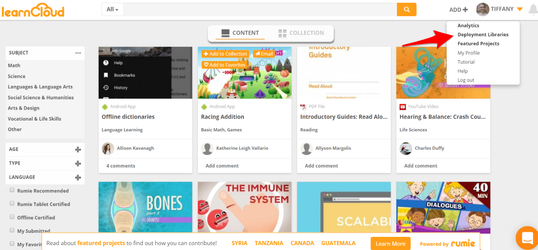
Image of the LearnCloud website. The Deployment Admin can access the LearnCloud Admin Panel options in the dropdown menu.
- In the LearnCloud website click the dropdown arrow next to the Deployment Admin profile picture and name located in the top right hand corner of the screen
- Select “Deployment Libraries”
- Select “Create Deployment Library”
- A window titled Add Deployment Library will appear
- Type a name for the Deployment Library
- Select the Deployment that will be associated with it from the dropdown
- Click “Save”
Selecting Collections and Content for your Deployment Library
To ensure a Collection that you have created is not altered when in your deployment library, you must clone the Collection or select "Make this a closed collection (only you can add content)."
Creating a New Collection for your Deployment Library
- Navigate to the main page in the LearnCloud website
- Select “Content” which is listed near the top middle of the screen
- Find a piece of Content to add to a new Collection
- Move the cursor over the Content card
- Click “+ Add To Collection”
- Select “New” tab
- Chose a Collection name and enter a Description
- Chose Categories, add Age Groups and Languages
- Select “Add to Collection”
- Repeat steps 1-9 to add more Content to the newly created Collection
Adding Content to an Existing Collection for your Deployment Library
- Navigate to the main page in the LearnCloud website
- Select “Content” which is listed near the top middle of the screen
- Find a piece of Content to add to an existing Collection
- Move the cursor over the Content card
- Click “+ Add to Collection”
- Select “Existing” tab
- Click on “Select Collections”
- Select an existing Collection
- Click “Add to Collection”
Adding an Existing Collection to a Deployment Library
- Navigate to the main page in the LearnCloud website
- Select “Collection” which is listed near the top middle of the screen
- Find a Collection to add to the Deployment Library
- Move the cursor over the Collection card
- Click “+ Library”
- Select the Deployment Library
- Click “Add to Deployment Library”
Uploading Content to LearnCloud
Uploading a PDF
Adding a PDF Directly to LearnCloud
- Right Click on the PDF
- Select “Copy Link Address”
- Navigate back to the LearnCloud website
- Click “ADD +”
- A window will pop up titled Add Content
- Click “Link”
- Paste the Link
Add PDF from Computer to LearnCloud
- Click “ADD +”
- A window will pop up titled Add Content
- Click “Upload”
- Drag & Drop your PDF or “Open File Browser”
Uploading a YouTube Video
- On YouTube website, select the video to be uploaded
- Navigate to the specific video page
- Copy the video URL
- Navigate back to the LearnCloud website
- Click “ADD +”
- A window will pop up titled Add Content
- Stay on the Link tab
- Paste the video URL
If there is a YouTube video that is embedded in another website, open up the video and select the video URL not the website URL that it is on.
Uploading an App
- Navigate to the app on Google Play store
- Navigate to the specific app page
- Copy the app URL
- Navigate back to the LearnCloud website
- Click “ADD +”
- A window will pop up titled Add Content
- Stay on the Link tab
- Paste the app URL
Offline Functionality
Most Content on the LearnCloud will work offline on the Rumie Tablets, however it is important to verify which resources require internet access.
Content that will work Offline
- PDFs
- Videos
- Some apps -- filter apps with the Offline Certified checkbox to sort which apps are confirmed for Offline usage
Content that will not work Offline
- Links
- Select apps
Links
If a piece of Content is highlighted in red in the Deployment Library and there is a symbol beside it, it means that it is a link and cannot be loaded onto Rumie Tablets. Instead, try to find a PDF or video that provides the same information as the link, or save certain pages of a website as PDFs and add them to the LearnCloud in order to include certain parts of a link. 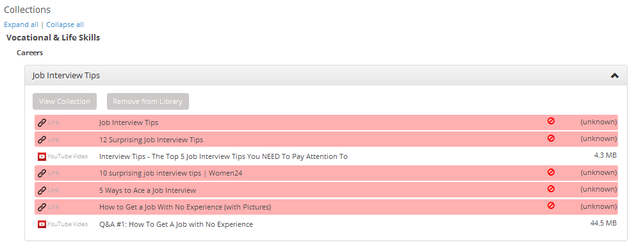
Image of a Collection inside a Deployment Library on LearnCloud. The red highlighted areas represent links that cannot be loaded onto Rumie Tablets.
Select apps
There is no easy way to automatically know what apps will require internet, are fully free, and work on the Rumie Tablets. Rumie tests apps and marks them as Offline Certified if they don’t require internet and Rumie Tablet Certified if they will work on the Rumie Tablets.
To see whether an app is Offline Certified and/or Tablet Certified, navigate to the Deployment Library, and click the Collection that has the app included in it. There will be two columns of Xs or ✓s next to each app.
- The first column identifies whether a piece of Content is Offline Certified
- The second column identifies whether a piece of Content is Tablet Certified
There will be an X for apps that are not certified and a ✓ for apps that are certified.

Image of a Collection located in a Deployment Library on LearnCloud.
Including an app that is not Offline or Tablet Certified
- Keep the app(s) desired for use in the Deployment Library
- When the Deployment Library is completed, a Rumie representative will test the apps and establish which will work and which need to be removed and possibly replaced
Organizing Collections for Tablets
When there has been changes made to a Deployment Library’s Collections or Content through the LearnCloud Admin Panel, the Rumie Tablets will need to be updated as well (see Tablet User Guide).
Viewing Collections in the Deployment Library
- In the LearnCloud website click the dropdown arrow next to the Deployment Admin profile picture and name located in the top right hand corner of the screen
- Select “Deployment Libraries”
- Click “Manage” next to the name of the Deployment Library
- This page will show all of the Collections added to the Deployment Library and how much space they will take up on the Rumie Tablet
Organizing Collections and Content
Collections
- In the LearnCloud website click the dropdown arrow next to the Deployment Admin profile picture and name located in the top right hand corner of the screen`
- Select “Deployment Libraries”
- Click “Manage” next to the name of the Deployment Library
- Under the Summary section at the top of the page, drag and drop the Collections into order as wanted to appear on the Rumie Tablet
Content
- In the LearnCloud website click the dropdown arrow next to the Deployment Admin profile picture and name located in the top right hand corner of the screen.
- Select “Deployment Libraries”
- Click “Manage” next to the name of the Deployment Library
- Select the Collection which Content is to be organized
- Click “View Collection”
- Hover the mouse on the piece of Content to be organized
- A four-headed cursor will appear allowing the Content to be dragged into another position
Removing a Collection
- Select the Collection that is to be removed
- Click “Remove from Library”
Setting which users can access each Collection
- The Permissions for each Collection can be can set inside the Deployment Library
- There are two options to use:
- Regular: Anyone can access this Collection
- Admin-only: Only users logged into the Tablet Admin account can access this Collection
Cloning a Collection
Cloning a Collection can be beneficial when wanting to create another Collection with the same, or similar, Content. After a Collection has been cloned, the Content can be reorganized, removed, or added without affecting the original collection.
It is also important to note that to ensure a collection which is being used in your deployment library is not altered, you must first clone the collection so it is exclusive to your deployment library.
Steps to Clone a Collection
- In the LearnCloud website click the dropdown arrow next to the Deployment Admin profile picture and name located in the top right hand corner of the screen.
- Select “Deployment Libraries”
- Click “Manage” next to the name of the Deployment Library
- Select the Collection to be cloned
- Click “Clone Collection”
- Enter the desired name, description, and categories and click “Save”
- Remove the original Collection cloned from the Deployment Library, unless both versions are to be kept
How To View/Download Analytics
Analytics can be viewed by the Deployment Admin in the LearnCloud Admin Panel.
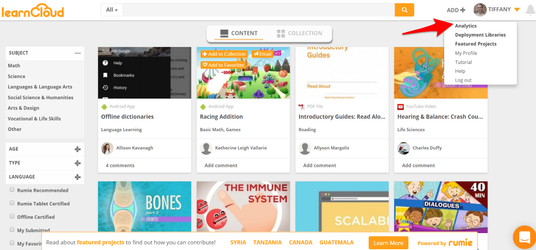
Image of inside the LearnCloud website. The Deployment Admin can access the LearnCloud Admin Panel options in the drop-down menu.
- Ensure that the Rumie Tablets have synced analytics (see Tablet User Guide for how to sync analytics on Rumie Tablets)
- In the LearnCloud Admin Panel navigate to analytics
- Select the checkbox in front of the Deployment name
- Select date range for usage analytics
- For a visual summary of analytics:
- Select “Type” -> “Summary” -> “Load”
- To generate a CSV file for detailed analytics:
- Select “Type”-> “Raw Data” -> “Download”
- To have a full overview of the Rumie Tablets analytics select “Load…”
- To see more specific analytics such as dates, gender, or age, toggle between these options
Data Usage for Analytics Sync
The average data that is used for analytics to sync from the tablet back to the LearnCloud Admin Panel is between as little as 75 -300 KB (0.075 - 0.3 MB) of data per user and tablet depending on the usage. To give an example, for a 50-tablet deployment, it is expected to use as little as 1,600 - 65,000KB (16-65MB) of data transferred each month. The total data transferred for analytics does not include application or content updates.
Related content
The Rumie Initiative